Hello and welcome to this brief guide on exploring Nanite Tessellation, an innovative feature that was introduced experimentally in Unreal Engine 5.3 and has now progressed to Beta in UE5.4.
Understanding Nanite Tessellation
Nanite Tessellation is an extension of the Nanite technology, which is designed to optimize the rendering of ultra-high-polygon meshes by reducing detail where it’s not needed. But what sets Nanite Tessellation apart is its ability to take low-resolution meshes and tessellate them into high-polygon versions internally. This process allows for the application of displacement maps, which extrude the surface to create a more detailed and three-dimensional appearance, significantly enhancing the visual depth of your models.
How to Enable Nanite Tessellation
To begin using Nanite Tessellation, a few specific settings need to be configured:

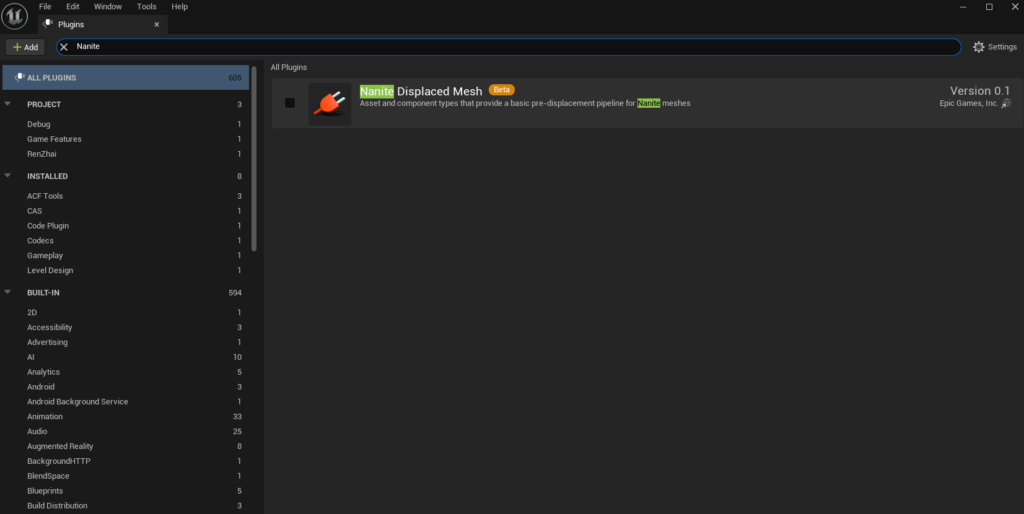
- Activate the Plugin:
First, you’ll need to enable the Nanite Displaced Mesh plugin. Open the Plugins window in Unreal Engine and activate this plugin. - Configure the Console Commands:
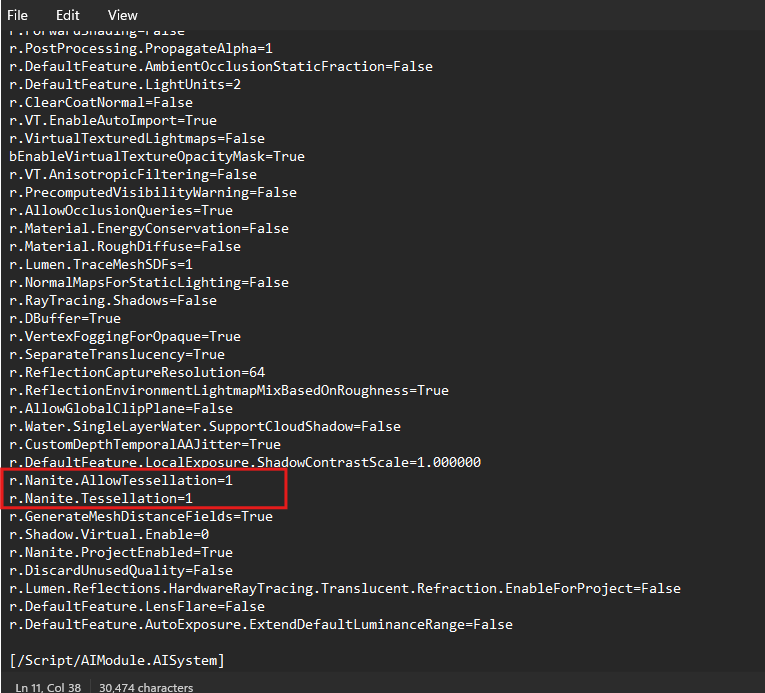
Some settings required for Nanite Tessellation are read-only, so it’s advisable to write them directly into an initialization file (ini). Navigate to the DefaultEngine.ini file located in the Config folder of your project, and add the following lines:r.Nanite.AllowTessellation=1 r.Nanite.Tessellation=1After these configurations, you can enable the tessellation feature in the material’s Detail settings by checking the “Enable Tessellation” option. This will also unlock the “Displacement” settings for the material.

Creating a Nanite Tessellation Material
Now, let’s create a material utilizing Nanite Tessellation. We’ll design a material that blends multiple textures—like plaster and aged bricks—into a cohesive and dynamic surface.
- Using Material Attributes:
Start by enabling the “Use Material Attributes” checkbox in the material’s Details panel. This aggregates your material pins into the Material Attribute type, making it easier to manage complex materials. - Creating Texture Combinations:
Create a “Make Material Attributes” node and connect your plaster texture to it. For better control over the texture mapping, generate a custom UV application method using the Named Reroutes node and link it to the Texture Sample. - Adding Additional Textures:
Similarly, create another “Make Material Attributes” node for the brick texture. To blend these two textures together, use a “Blend Material Attributes” node, connecting each texture material appropriately.
Customizing Material Composition
To make our material more visually interesting, we’ll incorporate a circle within the material, transforming the area inside the circle into a brick texture. By blending the height information of the bricks with the circular pattern, you can achieve a more organic and natural transition.
- Blending Techniques:
Connect the blending method of your material to the Alpha value in the “Blend Material Attributes” node. Adjust the Displacement information of the plaster texture so that it appears higher than the bricks, creating a layered effect. - Fine-Tuning Parameters:
Finally, tweak the material parameters to control the areas that transform into bricks, allowing for dynamic changes and variation in the material’s appearance.
The Advantages of Nanite Tessellation
Nanite Tessellation builds on the capabilities of Nanite by enabling high-density, three-dimensional expression without relying solely on complex models. Instead, it uses HeightMapTextures, which are more flexible and can be manipulated within materials. This opens up a world of possibilities for creating variations and animations, making Nanite Tessellation a powerful tool for artists and developers looking to push the boundaries of visual detail and realism.
Exploring the potential uses of Nanite Tessellation is incredibly exciting, and the creative possibilities it unlocks are endless. Whether you’re working on intricate architectural details or lifelike terrain, this technology is set to revolutionize how you approach 3D modelling and rendering in Unreal Engine.